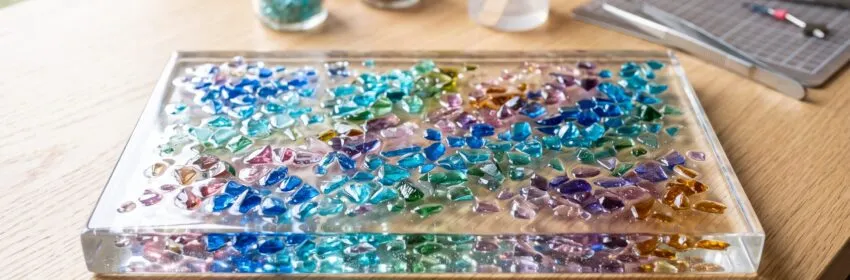
Resin art is a fun way to turn simple materials into beautiful decorative pieces. While resin can be used on its own, adding colored glass chips can give your project more texture, depth, and visual appeal.
Colored glass chips are small pieces of decorative glass available in many colors, shapes, and finishes. When they are placed inside clear or colored resin, they can create effects that look like gemstones, stained glass, or colorful stones.
The best part is that you do not need to be an experienced artist to get started. With the right materials, a simple design, and a little patience, you can create unique resin artwork at home.
What Is Resin Art with Colored Glass Chips?
Resin art involves mixing a liquid resin with a hardener and pouring the mixture into a mold, onto a surface, or over an object. As the resin cures, it becomes a hard, glossy material.
Adding colored glass chips creates another layer of design. The glass catches and reflects light through the transparent resin, making the finished piece more interesting.
You can use this technique to create:
- Resin coasters
- Decorative trays
- Tabletop designs
- Wall art
- Jewelry
- Keychains
- Serving boards
- Small decorative panels
- Garden decorations
- Custom artwork
Because colored glass chips come in different colors and sizes, every project can have its own appearance.
Materials You Will Need
Before starting your project, gather everything you need. Having your materials ready can make the process easier and prevent interruptions while working with resin.
Basic Materials
You will generally need:
- Clear casting resin
- Resin hardener
- Colored glass chips
- Silicone mold or suitable work surface
- Mixing cups
- Wooden mixing sticks
- Disposable gloves
- Measuring tools
- Small tweezers
- Protective covering for your workspace
You may also want to use resin pigments, mica powder, glitter, or other decorative elements. However, keeping your first project simple can make it easier to understand how resin behaves.
Choose the Right Colored Glass Chips
The glass chips are one of the most important parts of this project because they determine much of the final appearance.
Look for smooth, decorative glass chips that are suitable for craft projects. Avoid using sharp pieces of broken glass, especially if you are a beginner.
You can choose one color for a clean and modern appearance or combine several colors for a more artistic effect.
For example:
Blue + white: Creates a cool, ocean-inspired look.
Green + gold: Gives the piece a natural and elegant appearance.
Purple + pink: Works well for colorful decorative artwork.
Black + silver: Creates a bold, modern design.
Multiple bright colors: Perfect for playful and creative pieces.
Try to think about the overall design before mixing your resin.
Step 1: Prepare Your Workspace
Resin can be difficult to remove once it has cured, so preparation is important.
Cover your working surface with a disposable sheet or another suitable protective material. Make sure the area is clean, level, and free from unnecessary objects.
Work in a well-ventilated area and follow the safety instructions provided with your specific resin product. Wear suitable gloves and avoid getting uncured resin on your skin.
If you are working with children, resin should be handled by an appropriate adult according to the product’s safety instructions.
Step 2: Plan Your Design
Before pouring anything, arrange your colored glass chips separately.
This gives you a chance to experiment with different patterns without wasting resin.
You could create:
- A simple border
- A random mosaic
- A gradient from light to dark
- A geometric pattern
- A flower-inspired design
- An abstract arrangement
- A wave or river-style pattern
For beginners, a random mosaic is one of the easiest options. Simply combine different sizes and colors while leaving enough space for the resin to flow around the chips.
Step 3: Mix the Resin
Follow the manufacturer’s instructions carefully when mixing your resin and hardener.
The correct ratio is important. Using too much or too little of either component can affect curing and the final finish.
Pour the required amounts into a clean mixing cup and stir slowly. Avoid aggressive mixing because it can introduce a large number of bubbles.
Scrape the sides and bottom of the cup while mixing to ensure the two components are properly combined.
Step 4: Add Your First Layer of Resin
Pour a thin layer of resin into your mold or onto your prepared surface.
Do not fill the entire mold immediately if you are creating a design with multiple layers.
A thin base layer can help create depth and give your glass chips something to sit against.
Spread the resin gently if necessary.
Step 5: Add the Colored Glass Chips
Now comes the creative part.
Place your colored glass chips into the resin according to your design. You can use tweezers for smaller pieces or carefully position larger chips by hand while wearing appropriate protection.
Try not to overcrowd the surface.
Leaving some clear resin between the glass pieces can create a beautiful floating effect and allow light to pass through the artwork.
You can also slightly press some chips into the resin so that they sit at different depths.
Step 6: Create Layers for More Depth
One of the easiest ways to make resin artwork look more professional is to build it in layers.
Instead of placing all the glass chips at the same level, add some pieces to one layer and others to a later layer.
For example:
Layer 1: Clear resin base
Layer 2: Blue and white glass chips
Layer 3: Clear resin
Layer 4: Smaller decorative glass chips
Final layer: Clear resin for a smooth glossy surface
This technique can make the glass appear suspended inside the resin.
Step 7: Remove Bubbles Carefully
Small bubbles can sometimes appear while mixing and pouring resin.
Allowing the resin to sit for a short period can help some bubbles naturally rise to the surface. Follow your resin manufacturer’s instructions for any bubble-removal technique or tool you use.
Do not apply excessive heat, as too much heat can damage resin, molds, or decorative materials.
The goal is to create a clear surface without disturbing the glass chips.
Step 8: Let the Resin Cure
Once your design is complete, leave it somewhere clean and level while it cures.
The curing time depends on the type and brand of resin you are using. Do not move the piece too early, even if the surface appears dry.
Moving it before it has fully cured can cause uneven surfaces, fingerprints, dust marks, or shifting glass chips.
Always check the manufacturer’s recommended curing time.
Step 9: Remove and Finish Your Artwork
After the resin has fully cured, carefully remove the piece from the silicone mold if you are using one.
Inspect the surface and edges.
If necessary, lightly finish rough edges using an appropriate method for cured resin. Make sure you use suitable protective equipment when sanding cured resin and follow safe handling practices.
For a tabletop or decorative piece, you can now display your finished artwork.
Creative Ideas for Colored Glass Chip Resin Art
Once you understand the basic technique, you can experiment with different styles.
Ocean-Inspired Resin Art
Use different shades of blue, turquoise, white, and clear resin. Arrange blue glass chips in flowing patterns to create the impression of water.
A few lighter glass pieces can imitate reflections on the surface.
Geometric Resin Art
Create triangles, lines, circles, or other geometric shapes using glass chips.
Choose two or three contrasting colors for a clean and contemporary design.
Floral-Inspired Design
Arrange green glass chips as leaves and colorful pieces as flowers.
You can place them on a clear resin background for a simple decorative piece.
Abstract Mosaic
If you prefer a more artistic approach, skip the strict pattern.
Combine different colors, shapes, and sizes to create a random mosaic. This is also a great option when you have leftover glass chips from other projects.
Dark and Metallic Design
For a dramatic appearance, combine dark-colored glass chips with metallic resin pigments.
Black, deep blue, silver, or gold can produce an elegant decorative effect.
Tips for Better Resin Art
A few simple techniques can make a noticeable difference in your finished project.
Do Not Add Too Many Glass Chips
It can be tempting to cover the entire surface with glass. However, too many pieces can make the design look crowded.
Allow some resin to remain visible.
Think About Color Balance
Try to distribute colors throughout the design instead of putting all pieces of one color in a single area.
This creates a more balanced appearance.
Use Different Glass Sizes
Combining larger and smaller chips can add texture and depth.
Large pieces can become the main visual elements, while smaller pieces can fill gaps.
Keep the First Project Small
A coaster, small tray, or decorative tile is easier to manage than a large tabletop.
Starting small allows you to learn how the resin behaves before moving on to larger projects.
Avoid Overmixing
Mixing resin too aggressively can create unnecessary bubbles.
Slow and steady mixing is generally better.
Common Mistakes Beginners Should Avoid
DIY resin art is relatively simple, but beginners often make a few common mistakes.
Incorrect resin ratio: Always follow the manufacturer’s instructions.
Rushing the curing process: Give the resin enough time to fully cure.
Using unsuitable glass: Decorative craft glass is preferable to sharp broken glass.
Overcrowding the design: Too many chips can hide the resin and make the artwork look messy.
Working on an uneven surface: Resin naturally moves while curing, so a level workspace is important.
Ignoring dust: Dust can settle on wet resin and become trapped in the finished surface.
Moving the project too soon: Even a small movement can affect the final result.
Why Colored Glass Chips Work So Well with Resin
The combination of resin and glass works because the two materials create an interesting contrast.
Resin provides a smooth, transparent, glossy background, while glass chips introduce color, shape, texture, and light reflection.
Clear resin can also make the colored glass appear deeper than it actually is. When light passes through the finished piece, the glass can create subtle reflections that change depending on the viewing angle.
This makes each finished project slightly different.
Final Thoughts
DIY resin art with colored glass chips is a creative project that allows you to experiment with color, texture, transparency, and depth.
You can keep your design simple with a few carefully selected glass chips or create a detailed mosaic using multiple colors and layers. The process is flexible, so there is plenty of room to develop your own style.
For beginners, the best approach is to start with a small project, plan the design first, use suitable decorative glass, follow the resin manufacturer’s instructions, and give the piece enough time to cure.
With practice, simple glass chips and clear resin can become eye-catching artwork that looks completely different from ordinary resin projects.
